Local SEO Checklist 2023 – Improve Your Local Search Rankings

Local SEO Basics: Strategies To Improve Your Rankings

Picture this – A customer walks out of your store with a highly satisfied experience. He then unlocks his phone and opens up Facebook or Instagram. He is still thinking about your service and searches for your brand name. He finds your handle, starts following it and probably likes/engages with the first few posts.

What happens when your brand is not on social media? How is your customer expected to find you, rate/review his experience or stay updated with your brand?

Why should my business get on social platforms?

The advantages of getting on social platforms is multifold for any business. Let’s try and highlight a few here:

  1. Reach new people
  2. One of the primary incentives for any brand to build a profile on social media is for increasing brand awareness. Since a majority of your customers are active on social platforms, it only makes sense for you to build an established presence there. In order to build engagement that is significant, you have to stay active on a regular basis and gather some following.
    Most platforms like Facebook, Twitter, Instagram, Pinterest, Youtube and Reddit allow businesses to advertise now. Your main objective for advertising on social media should be to widen your brand’s reach and thereby the awareness. You can reach new customers on platforms like Facebook and Instagram at a cost that is easy on your wallet.
    If you are not willing to advertise and would like to organically increase your reach, make sure you set aside some time on a daily basis. Your efforts should not be misguided or stray away from your goal. Always try to establish your brand’s authority in the space. Your content can also be used to build thought leadership for your business.
    Reconnect with customers
  3. A straightforward reason for getting on social media is your customer base. You need to be able to reconnect with them even when they are not being serviced by you. Building an engaged community on social media platforms with your customers might sound like a daunting task. In all fairness, you just have to talk about things that might matter to them. This could include informative content, motivational posts and even daily tid-bits.
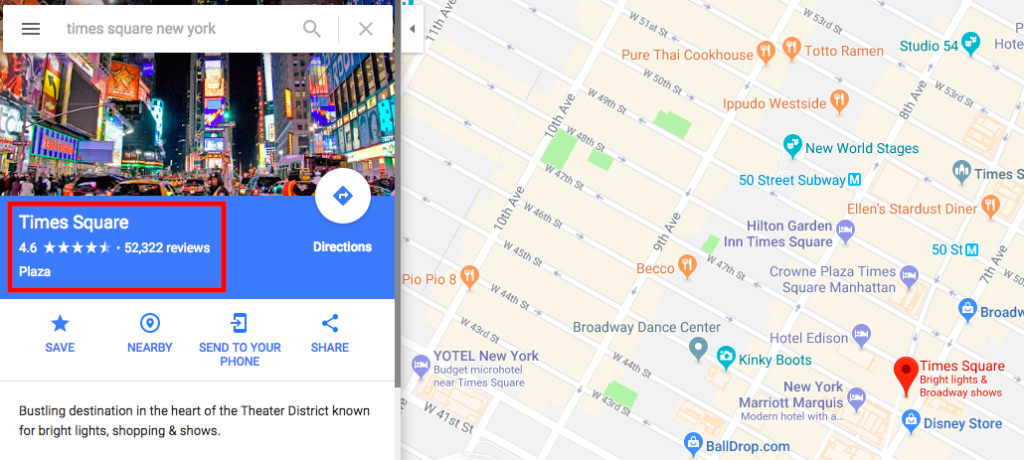
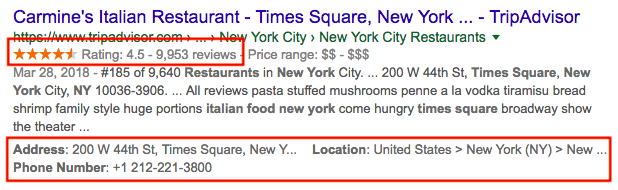
    Consumers these days make it a point to review brands that they have interacted with. As a business that is looking to tap into the local market, you need to get in on this. On Facebook, every user gets notified after checking into a business. The notification asks the user to rate and review the place. In the event that he does review your business, it appears in all of his friends’ feed. This is how the cycle starts.
    Build brand persona
  4. While planning the digital marketing strategy for your business, social media has to be on the list. Social media marketing is just like word-of-mouth marketing in the 21st century. While it works in the most simple and lucrative format, you need to put in some effort to get the ball rolling.
    The consumer market today is waiting to get roped in. You have to tie that lasso in the right way and throw it in the direction you wish. Building a persona for your brand is very important when it comes to social media. Conversely, you can use social media as one of the primary channels to propagate your brand’s persona.
    Building a story around your brand can help people relate to it more. You should aim at building an emotional connect between your target audience and your business in a way that the product or service you offer speaks to them. Social media can be a huge stage for this.
    It’s great for local SEO, duh!
  5. Creating profiles on different social platforms for your business is a huge plus for local SEO. Every social handle you create is a high value backlink to your website. It also acts as a gateway for more visitors to your site. In simple terms, you are listing yourself on another online directory. But in this case, you have to actively participate in it to yield its benefits to the maximum.
    When you post images of your storefront, you should make it a point to tag the location as well. By doing so, customers who look for information in the area or for a service/product similar to yours in the vicinity might stumble upon it.
    You can also check-in or tag your business in local events that you take part in. This way, the community around you knows that you are involved and engaged in activities.
    Traffic → Leads → Conversion!

All the efforts that you put in on social media platforms should translate into traffic to your website. After all, the objective is to be able to convert every follower into a prospective customer. Once they are on your website, you have to look to convert them into leads efficiently.
Alternatively, you can leverage on social media advertising to generate leads through the platform directly. You can look at promoting content pieces, run simple and engaging contests, run lead generation ads or even promote offers and discounts.

If you aren’t taking advantage on social, you are missing out on a lot. For any business, social media platforms should be a fast, inexpensive and efficient mode of communication with your customers. They help boost your local SEO through reliable citations, source of reviews and also improve your rankings on search engine ranking pages.

For a business like yours that is looking to improve on local SEO, it is important to understand the consumer behavior. Based on statistics from 2017, 75% of the internet users used Google as their primary search engine. It implies that you should pay serious attention to your business information on Google.

Although search engines like Bing and Yahoo might not be getting the volume of traffic like Google does, are still responsible for a good chunk of your customers’ enquiries. In all fairness, you should be giving your business’ presence on Bing and Yahoo equal importance.

Bing - the search engine and its audience

Bing is the world’s third largest search engine (after Google and Youtube). Microsoft claims that over 33% of Americans continue to use Bing as their primary search engine.

As a business owner, you should definitely look to create or claim your business listing on Bing Places which is very similar to Google My Business. A feature of your brand on Bing Places can help you tap into the audience that uses Bing as their primary search engine. It will also add as another backlink and mention on the web that will boost your overall local SEO efforts.

How to Create or Claim your Bing listing?

Visit this link for an easy to follow, step-by-step guide of submitting your business information to Bing Places.

As a business owner, you should always make data-driven decisions. Especially for your business website. Starting from the content and color scheme, right down to the layout and structuring, every element on on your website should be present with a purpose.

At every instance, when you add, remove or modify an element on your website, it should be backed by sufficient data. If not so, why would you do it? And how would you justify it?

What is Google Analytics?

Google Analytics is a free web analytics software from Google. In simple terms, Google Analytics tracks and reports the traffic to your website. It is a powerful tool that is used by businesses of all sizes. Whether you’re a plumbing business or an e-commerce portal, a lot is to be learned from the data on Google Analytics.

It is important for you to know what your users want. Your website should be a reflection of your customers’ needs. Analytics provides you with insights that can be used to prepare a marketing success strategy. It allows you to study consumer behaviour on your website in different ways and enables better delivery from your business’ end.

How to set up Google Analytics?

The main objective behind setting up Google Analytics for your business website is to gather data and interpret it. The final goal would be to improve your customer journey through the website and grow the business.

  • Visit and sign in to your account. It is highly recommended to create a separate Google account for your business. This could be the same mail ID that is connected to your Google My Business (GMB) listing.
  • After signing in, you will have to click on the “Sign Up” button on your right hand side.
  •  Google Analytics works for both websites and mobile apps. Hence, on the next page you will be asked to pick one of the two. (We will be talking about setting up Google Analytics for websites here.)
  • The next field you will have to fill is “Account Name”. This will be the name of the account at the top level. Going forward, you can add multiple websites under this account. This is generally the same as        the business name.
  • Under Website Name, you should enter your exact business name. Let’s say you own a chain of salons called CherHair in three different locations and have a different website for each of these locations. Then your Account name would read CherHair Salon and the subsequent website names would be Cher Hair Salon – Location 1, CherHair Salon – Location 2 and so on. These names are just for your and your team’s understanding. The simpler they are, the easier it would be for everyone using Analytics.
  • The next step would be to fill in your website address. Make sure you pick http or https, based on whether or not you have an SSL certificate.
  • You should definitely pick an industry category because Google will help you with benchmark data from similar businesses. If you don’t find an option that perfectly fits your business, you should go ahead and pick something that seems the most relevant.
  • At the end of the page you will come across checkboxes that seek your permission for data sharing with Google and their support teams. You can go ahead and decide for yourself what you would like to share.
  • Once you are done and have selected the “Get Tracking ID” option, accept the terms and conditions. You are now done setting up your Analytics account. What is left to do is to install the code on your website.
  • There are multiple ways in which you can add the Analytics code to your website. The method you  follow also depends on the CMS you use. If you use WordPress, integration becomes easier with a free plugin.
  • You can also add the tracking code directly into your website files. All you have to do is copy the entire script from your Analytics dashboard and paste it into your code. You have to place it in the head section of a file that is included on every page of your website and loads on top. Google recommends that it be included before any CSS style sheets or javascript files.
  • After uploading the updated file on your website, you can send test traffic from the Analytics  dashboard just to be sure that you’ve integrated the script properly. You will find this option on the same page from where you picked up the script.

Google Analytics is a free analytics platform that is easy to set up. It is used worldwide and provides insightful data that even Fortune 500 companies would swear by. Every business should use some form of analytics platform to make sense of the activity on their website. And Google Analytics is one of the best options available.

You know those security checks you face before getting on a flight or traveling on a cruise ship? As annoying as they might seem, they are necessary protocol that every traveler has to go through. These security checks ensure that the entire journey is hassle-free and smooth for you and the staff onboard.

Similarly, if you have a business website and are looking to improve on your local SEO, you will have to ensure that all the gears are oiled and working in optimal condition. Google Webmasters tools helps you with this.

What is Google Webmasters tools?

Google Webmasters tools is a free tool that Google allows all website owners to use. Think of it as a basket of Christmas goodies that Google left out of their office. And now, it is available all round the year!

Google Webmasters tools comprises of numerous technical checks that you can make use of for free. As a business owner, you want your website to be found on the internet by the right audience. Through Webmasters, Google is trying to help you with the same.

Why do I need Google Webmasters?

The best way to increase customer traffic to your website, is hands down, through working on local SEO. While you are improving your local SEO efforts, you should be making use of Google Webmasters’ tools to keep your site elements on check.

Google Webmasters help website developers with insights on how search engines interact with the website. Developers who swear by the webmasters tools, check in on a daily basis and try to clear the various bugs that show up. The tool produces reports on the number of keywords your website is ranking for, the kind of traffic you get, among other useful metrics. Additionally, the Google Webmasters dashboard will also tell you if the Google crawlers come across any errors while crawling through your website. You can also find out the number of pages Google has indexed on your website.

Sometimes, people confuse Google Analytics to be the same as Google Webmasters. Just to clarify in simple terms, Google Analytics would give you data on the interactions between your website and its visitors. On the other hand, Google Webmasters is a little more technical and gives data on how search engines interact with your site.

How do I setup Google Webmasters?

  1. Firstly, you need to be signed into your Google account. This account should be the same as the one linked to your Google My Business (GMB) listing.
  2. After signing in, you need to visit and click on the top-right-corner option to get started. Here, you will be asked to enter your website address.
  3. At this point, Google will ask you to verify that the website address you entered is yours. There are multiple ways to do so:
    • You could upload an HTML file
    • Sign in to your domain name provider
    • Verify through Google Analytics (This can be done if your gmail ID has administrator rights on the Analytics dashboard)
    • Through Google Tag Manager
  4. The procedure to verify is pretty straightforward and simple. Just follow the instructions given for the method of verification you pick and you should be done in two – three minutes.
    After verifying that the website address is indeed yours, your Google Webmasters tools should be ready to use.

It might take a couple of days for the data to get populated on the dashboard if your account is new. An easy hack to speed up this process, is by uploading your XML Sitemap on Webmasters. By doing so, you are requesting the search engine to index it.

What’s next?

Wondering what to do after setting up Google Webmasters? Here is a brief note:

  1. Check the dashboard for numbers. You can gain an understanding of the traffic your site gets, keywords you rank for, errors that Google bots face while crawling, number of site links, etc.
  2. Create and upload a Sitemap on Webmasters to speeden up the indexing process
  3. Use the robots.txt generator and tester to create and test out your robots.txt file. To put it simply, the robots.txt file gives instructions to the crawlers that visit your site
  4. You might have noticed certain sitelinks that pop up along with your search engine result. You can remove or edit some of these sitelinks that Google picks up using Webmasters. Otherwise, these links are picked up by the search engine itself
  5. Using Webmasters, you can also let Google know when you are changing your website address. This will ensure that you do not lose out on any of the traffic
  6. You can also keep a track of the number of links to your website through Google Webmasters

The above is just a gist of the information you can get from Google webmasters. If you are new to the tool, all you have to do is surf through the different options you see to get an idea of what more you find and can use.

Google Webmasters is a tool that gives you insights about your website straight from the horse’s mouth. Right from broken pages to link penalties, you can track it all with Google’s help. Make it your developer’s go-to tool and you should see the improvement in traffic.

The act of selecting business categories while listing your brand on Google has been hyped on multiple occasions. It might come across as a daunting task. In reality, it is a fairly simple ordeal. The only catch with selecting business categories on your Google My Business (GMB) listing is that you have to do it right! Any other way might affect your visibility online.

If you already have a GMB listing for your business, but have selected the wrong categories, you can still get this right. Fret not because Google provides the option for you to login to your GMB listing master account and modify your selection.

What are local business categories?

As the name indicates, these are tags that you can associate your business listing on Google with. Google allows you to pick a main category for your business and a bunch of additional categories. This has been created so that you can categorize your business in the best way possible.

Let’s say you own a restaurant that serves pizza. Based on the categories you select, Google would relate your business to Italian restaurants, pizza, and even restaurants. An important aspect to note here is that, selecting the right business categories alone does not boost your local SEO. It is another signal to the search engine crawlers.

How do I select the right categories?

As a basic rule of thumb, it is important for you to only select the business categories that make the most sense for your business. The way you categorize your business should be able to describe your brand the best.

Selecting categories just for the sake of specific keywords is a practice that Google condemns. The only way you can improve your local SEO with business categories is by selecting the most relevant ones.

If you do not find a category wherein your business fits the best right away, fret not. You might have to place it in a slightly more generalised category. You cannot create a new category for yourself, as Google does not allow this.

Don’t pick categories that might best describe the attributes of your business. If you own a shopping mall that houses a cafe and a deli, then the categories “Cafe” or “Restaurant” do not make sense for you. This might confuse Google and your customers as well.

In the event you add or edit the existing combination of categories selected for your business, Google will ask you to re-verify your listing. This is done to make sure that the changes made and the content shared is of utmost accuracy.

While going through the existing list of categories and picking the ones that seem to fit the best for your brand, always know that the search engine is not stupid. If you pick the category “Nail salon”, you automatically get listed under the category of “Salons” as well.

How do I pick Additional Categories?

Once you have setup your GMB listing and then visit your profile info, you will notice an option that allows you to add additional categories for your business.

Keep in mind that the additional categories you select have to be in accordance with your primary category. Let’s say you are an Italian restaurant that serves pizza and also offers takeaways and deliveries. Categories like “Pizza Delivery”, “Pizza Takeaway”, “Pizza Restaurant”, etc. can be your additional categories.

Make sure you do not pick categories that stray away from the primary choice. The main objective behind adding this information to your listing is enhancing it and making it useful for customers out there.

Although picking the categories might be just one small aspect of the entire task, it is also one of the efforts that collectively affects your local SEO.

Have you ever followed the directions to a particular store or establishment and reached the destination only to realize that the pin location was wrong? All this time you wasted to get there, could have been put to better use. The scenario is so frustrating!

To paraphrase the same situation, would you want any of your customers to experience similar anguish when your brand is involved? Definitely not. The first step towards fixing this is to create or claim your Google My Business (GMB) listing.

Importance of an accurate GMB listing

It is safe to assume that most of us use Google maps to navigate more often than we would like. Since a large amount of the population uses GPS navigation while driving or walking or even when planning out the errands for the day, it only makes sense for businesses like yours to pay attention to your GMB listing.

While creating or claiming your GMB listing, it is important to double check the details you enter. You have to make sure that the details you enter on your GMB listing is the same as it is on the rest of the directories, including your website. If it wasn’t apparent enough already, you have to make sure that complete location data is featured on your website. It ensures that the search engine crawlers pick up only the right information about your business, no matter where they come across it.

Accuracy of your business data is very important for your brand online. Search engines are very smart, but when it come across inconsistencies in the Name, Address and Phone number (NAP) for your business, they register it as a different business location. This can prove to be very harmful for your brand as customers might get confused.

Aspects to consider in your GMB description

Google requests for basic information when creating a GMB listing. Here are a few aspects you should definitely concentrate on:

1. NAP

As stated multiple times, your business NAP details are very important. But if left unattended to, it can cause a lot of damage to the incoming business revenue. Therefore, it is important to have accurate address and phone number of your business on Google.Your business might be new. But when it is replacing an older business at the same address, Google might not recognize your business with the same address. In such a case, you might have to claim the older business’ listing and change the details. 

The business name you provide on your GMB listing should be consistent across the web. It needs to be the same as seen on your storefront and your website. The more uniform your business name is online, the easier it will be for customers to find you.

2. Website address

Most businesses these days have a website. Naturally, Google introduced a field wherein you can feature your business website on your GMB listing. You might have noticed the website button that comes up along with location details on Google.

When you enter your website address in your GMB listing, Google connects the same with your business. When a customer searches for a product or service that your business might be offering, Google will pull up your listing and possibly some details from your website.     

3. Business hours

Google allows you to list your regular business hours. You must only enter the customer-facing or servicing (as applicable) for your business here. You can even specify special timings that you follow on weekends, holidays or other special occasions.

4. Categories

Picking your business category while listing your business on Google can be tricky. The choice you make here, affects the overall SEO of your business. You can read this piece for a better understanding.

5. Additional Details

Apart from the basic business information, Google allows you to upload additional details as well. You could upload a menu for your business. This could be the menu of a restaurant or a rate-card of sorts of the services you offer (mostly used by spas, salons, automobile garages, etc.)

Now that you know of the information that you can add on your listing, below are a few items you should NOT be mentioning.

  1. Don’t use any display links as part of the GMB listing
  2. Don’t mention offers/voucher codes/ discounts that your business is promoting
  3. Don’t upload derogatory or offensive content
  4. Don’t publish any misleading content

Verifying your GMB listing

Once you’ve filled in all the details for your GMB listing, you will be asked to verify it. The verification process is done via mail. Google will send a postcard within two weeks of you placing the request and you will have to enter the code online to complete the verification process.

A verified Google listing can only be accessed by the account with which it was created. If required, you could authorize other accounts to manage the listing by adding representatives here.

Let’s take a common scenario of a person moving from one residence to another. When your address changes, you take the initiative to inform your family, friends, relatives and authorities like the bank who might mail you. In other words, you ensure that your mail is forwarded to your new address.

What happens when you decide to delete a page on your website or update the existing information on a new page? Your customers or website visitors deserve a memo! 301 redirects are used for this exact reason.

For whatever reason you might be deleting the page, it is highly recommended that you follow a systematic and methodical redirect procedure. In order to pass off the link equity and to retain the merit that the particular page on your website held, you should make 301 redirects a genuine practice.

What are 301 redirects?

Simply put, 301 redirects are commands that can help you point search engines and website visitors to a different page. Let’s say you want to point an old blog URL to a slightly modified and updated version of it on a different URL. You could use a 301 redirect for this. You could also use 301 redirects to point an entire website to a different domain name.

You must have noticed sometimes, when you type example.com in the address bar and you automatically end up on www.example.com/index.html. This is a 301 redirect working in its simplest form.

How to start off with 301 redirects?

Firstly, you need to understand that 301 redirects need to go into your .htaccess file. The .htaccess file resides in the root directory of your website and is the first file that gets triggered when a search engine crawls over your website. SImilarly, when a visitor lands on your site, this is the first file that is hit before your site pops up. Therefore, it makes sense that your redirect commands go into this file.

All you have to do is find this file and edit the existing content using any basic tool like Notepad on your computer. You must always ensure that you have a copy of your original .htaccess file saved on your computer. This is done just to make sure that you have your original code saved right. Also, bear in mind that you need to have everything else ready before actually putting in your 301 redirects. If there happens to be a case where the search engine indexes your faulty or mock 301 redirects before you fair them, it might end up being an issue for your website.

How do I setup 301 redirects?

The system has a simple syntax that goes as below.

As shown above, you have to ask the search engine crawler to navigate to the new URL (www.present.com/new) when visiting the old URL. You can replicate this for multiple pages and even use the same to point your old website domain to a new one.

As stated earlier, the said commands are to be included in your .htaccess file so that they get triggered at the right time.

Why do I need 301 redirects?

The simple answer to this is – traffic! Imagine not having set up redirects and few pages from your website have been deleted or taken down for some reason. Loyal customers or visitors try to land on these pages specifically, but don’t find what they want. This will result in your bounce rate getting worse and the search engine will end up reducing your Pagerank. The credibility that you have tried to build all this time with your website will get affected.

301 redirects and search engines

While making use of 301 redirects in your project, you have to understand that once you are done with your work is when the search engine crawlers’ work actually starts. The crawlers are going to take some time to scrape your website and understand that the old page has been redirected to a new one.

If you have fresh content going up on your website on a regular basis, it is highly possible that search engines index your site often. In such a case, your redirection will be picked up faster than the average expected time.

301 redirects or canonicalization?

Many advisors out there will tell you that using a 301 redirect is very similar to using a rel=”canonical” for your website. Well, this is not the case. From an SEO perspective, using a 301 redirect makes more sense when pointing page A to page B, or when pointing your website domain to new one. A canonical tag is used specifically to let the search engine know which of the said two pages is the original and which is the duplicate. This is done in cases where you have the same content, on let’s say two different URLs.

If your website is on WordPress, the process of redirection gets simplified for you automatically. You can download any of the plugins available and work using those.

In conclusion, using a 301 redirect is a straightforward and a simple fix if you are looking to permanently move said traffic from one URL to another. It is also advisable if you are moving your non-www pages to www. The added advantage with setting up 301 redirects is that it is highly search-engine friendly for your business website.

They say “With great power comes great responsibility”. While adding an XML sitemap to your business website gives it great power, you have to ensure that the sitemap is made responsibly. If you fail to pull out a proper XML sitemap, it might not make your website as “powerful” as you’d hoped.

A highly common misconception with XML sitemaps is that they trigger faster indexing of your webpages. This is not true. Google, or any search engine for that matter, does not index webpages based on the presence or absence of an XML sitemap. With the help of an XML sitemap, you are merely telling the search engine which pages are important.

What is an XML sitemap?

As the name suggests, an XML sitemap is a map of your website. It tells Google crawlers which pages are important and how to get there. They particularly come handy when not all of the internal pages of your website are interlinked. In such a case, you can add the URLs to the XML sitemap and crawlers will understand that these pages belong to your site.

Why do I need an XML sitemap?

XML sitemaps prove to be the most useful when you are launching a new website. In a case like that, you would not have many external links. The sitemap would include all of your webpage URLs with tags that tell the search engine more about your website.

Websites that have a complicated architecture also benefit through XML sitemaps. While search engines crawlers spend time to take in the content you upload, they can take a glance at your sitemap to understand what is important and what isn’t. It also gives them an idea of how often specific pages can get updated.

XML sitemaps are highly beneficial if your business website has many dynamic pages. This is mostly the case with E-Commerce businesses that keep updating webpages or keep on adding new ones. Search engines find XML sitemaps very useful for sites like these.

You can explain the priority of webpages to the search engine crawlers through an XML sitemap. Specific tags that are used in the sitemap tell Google which pages are more important than others. In a way, you give the search engine the bigger picture about your business.

XML sitemap and robots.txt

Every business creates mainly two kind of webpages. One that caters to the customers. The objective of such a page is to capture or interest the user by showing and giving them what they want. The other kind of webpage is created for search engine rankings.

This is where the need for a robots.txt file comes in. A robots.txt file is a text-based file that acts as a guide for search engine crawlers. This file contains instructions that tells the search engine bots how they should crawl the site. It is a part of the Robots Exclusion Protocol (REP). Most bits added to this file indicate whether search engine bots should or should not be crawling certain parts of the website.

In simpler terms, you might not want some of the utility pages you create to be crawlable by the search engine. But you will definitely want all of your search engine – friendly pages to get indexed. This file also plays a role in transferring link equity and credibility.

While you are listing the URLs on your XML sitemap, you can create the robots.txt file on the side and add instructions for each of the links.

How to create an XML Sitemap for your website?

Most content management systems for websites allow you to generate on automatically. There is a WordPress plugin available for this (as is for almost everything else). You can use other online tools that are available for free as well.

Once you are done creating the XML sitemap, you should make sure to check the following:

  1. The file opens and end with the right protocol.
  2. All URLs mentioned are complete and <url> tag is used to denote the beginning of each URL.
  3. If you have the same page in different languages, then the same should be indicated appropriately in your XML sitemap.
  4. Proper canonicalization methods are used to indicate domain redirection.
  5. The file should not contain alphanumeric or latin characters.                                                                                    

You can make your XML sitemap file available to Google by uploading it on Google Webmasters. Or, you can include the below piece of code in your robots.txt file.

Sitemap: http://example.com/sitemap-location.xml

You will have to include the appropriate file location in the above code.

Are you someone who obsesses with labels and label-makers? If your answer was no, you’re not going to like the task ahead of you.

While you’re working towards improving the local SEO for your business, you should work on a structured data markup for your website. It is a simple task that does not take very long. But it is a task that can help you earn brownie points with your local SEO efforts.

What is Schema?

The word “schema” means – a representation of a plan or a thesis using a model or flowchart. Schema from a local SEO perspective means the same, but let’s say the thesis here is your website and you have to create a model for it.

Why does my website need Schema?

Search engine crawlers are going through the content on your website on a regular basis. The Schema markup on your website is merely a structured way to help search engines find information about your website. This information can include your business location, the number of reviews your business has, what kind of business you are, etc.

Think of the Schema on your website as a repository of labels that these search engine crawlers can pick up. You paste labels on items to make their identification easier. This is why you need to have a Schema markup on your website.

Schema markup and Google

As is known, Google’s directions and recommendations are the bible when it comes to SEO. And as it turns out, Google recommends having a Schema markup on every website to enhance the site’s attributes. Google uses the structured data found on a page to understand the content on that page, as well as, gather information in general about the business.

Google also uses the information it gathers from the Schema of a webpage to enhance the search engine results it pulls out. Look at the below screenshot for example:

The details highlighted above – the rating of the restaurant, number of reviews, location and telephone number – have been picked up by the search engine from the Schema markup of the website.

Another advantage of using the Schema markup on your site is that once you start labeling every element, users can find your site link on the results page as well. For example, you have a list of accessories and auto parts of a car you are trying to sell on your website. If you label these parts in your Schema markup, your website can start ranking for those keywords as well.

How do I write a great Schema markup?

To start off with, you’ll have to check if your website has relevant Schema. You can do that using a free tool here.

Once you know which web pages don’t have relevant Schema, you can start creating them in the right format. Google recommends a JSON-LD format rather than an html format. If you aren’t tech-savvy, you could outsource it to your web developer. Or, you could create it using a free online tool, like this one.

Your end result should look something like this:

After creating your Schema in the required format, you will have to place it in the section of your webpage. You can recheck using the Schema Scanner used before.

Are there different types of Schema?

Yes, there are different types. You will have to select the type based on the kind of business you run. The above example is for a local business, here we are trying to ensure that the search engine picks up the location as well.

Always double check your Schema before uploading it on your website. A structured markup on your website makes sense from a technical perspective. It also adds credibility to your online business listings and thereby, helps improve local SEO.

In a world where all your customers have moved to the digital medium, it only makes sense for your business to also be present there. Research has shown that over 97% of consumers search online for products or services that they need. Therefore, your customer has to find you when they look for products or services that your business offers.

As a business owner, you have to pay attention to your local SEO. This is specifically important when customers are looking for a product or service offering in your store location’s vicinity. You want your business to be the top hit on any search engine for your focus keywords.

Use tools like Google’s Keyword Planner or Moz’s Keyword Explorer to get an idea of the number of people who might be searching your focus keywords. By not paying attention to your local SEO, you might be missing out on all of these customers. Your objective should be to increase quality traffic to your website. You should also look at increasing the direction requests to your store locations.

Why should I add location data on my website?

The benefits of adding location data on your website are multifold. Primarily, it helps boost your local SEO.

Include the Name, Address and Phone number (NAP) of your business (es) on your website. This is a way of telling search engine crawlers that the information is authentic. It validates all your business listings on various online directories.

Your website is considered to be the mecca of your business. Ideally, it should hold all the information pertaining to your business which you would want your customers to know. Details about all your business locations, along with contact information that customers can make use of, are be a must.

What is a location page?

A location page is not just another page you should build to get indexed by search engine crawlers. Businesses should look at building location-specific pages as a must for local SEO purposes. These pages can also come into play when you are planning to run campaigns or exciting offers for a particular location.

Think of location pages as highly focused landing pages that speak about just one branch of your brand. You can start off with a location-specific keyword research. Make a list of keywords that are relevant to a particular business location’s offerings. This can be thought of similar to content marketing for a specific keywords. The only difference here is you will be catering to the customers that only this outlet serves.

If you are a business with multiple locations, you should look at building a location page for every outlet. While doing so, your content needs to be focused on the semantic language and keywords of that specific region. This will help indicate that your brand cares about people and thereby, make people happy.

Build a fully optimized location page

In order to build a fully optimized location page, you should look at including the below details.

  • Feature accurate NAP as it is on your Google My Business (GMB) profile
  • State your business hours clearly for each location
  • Show pre-existing reviews for the specific location. You can use a WordPress plugin for this or you can use Synup’s customizable widgets that can be inserted on any page of your website.
  • Add links to GMB, Bing Places, Yahoo Local and your Yelp business profile. This can help you gain more reviews when customers visit the page. You can also add a dialogue that encourages them to click on these links to review you.
  • Focus on location-specific keywords while framing the content for your page.
  • Embed Google Maps with the location pin set to your store. This will enable customers find your business faster.
  •  All business location-specific media can be added. If you have additional images, videos or clips that customers might find interesting,      you should definitely upload those as well.
  • If your business has been featured in local publications or newspapers, add a link to the article on your page. Most businesses just add the logos of the publications because this helps in building trust.

While creating location-specific pages, you can create Keyhole Markup Language (KML) files. These files are created to point locations on tools like Google Earth. It can come in handy while creating your GMB profiles.

Alternatively, if your business does not have the bandwidth to create separate pages for all locations, you could host a single page (like a Contact             Us page) with the details of all your store locations.

 Your main motivation while working on this should be averting the disaster of bad location data. Inconsistencies in map locations or business              listings can eat away revenue and impact your rankings. Therefore, beware of faulty location data!